Authentication vs Authorization: The Simple Difference
Before diving into OAuth, let's clarify these two concepts in simple terms:
Authentication = "Who are you?"
- Proving your identity (like showing your driver's license)
- "Yes, this person is John Doe"
Authorization = "What can you do?"
- Checking permissions after knowing who you are
- "John Doe can access the VIP lounge but not the staff room"
Think of it: Authentication gets you through the front door, Authorization decides which rooms you can enter inside.
The Bar Analogy: OAuth 2.0 Explained
Let's say you own a members-only bar.
You don't want to personally check everyone's ID every time they order a drink — you'd rather trust a reliable bouncer who handles that once, and then give the customer a wristband so all staff know they're allowed in.
In the OAuth world:
- Google = the bouncer who checks IDs
- Authorization Code = the slip the bouncer gives you proving they checked
- Your Backend = the bar manager who takes that slip, records the customer, and gives them a wristband
- JWT = the wristband your bar uses to recognize customers without re-checking their ID every time
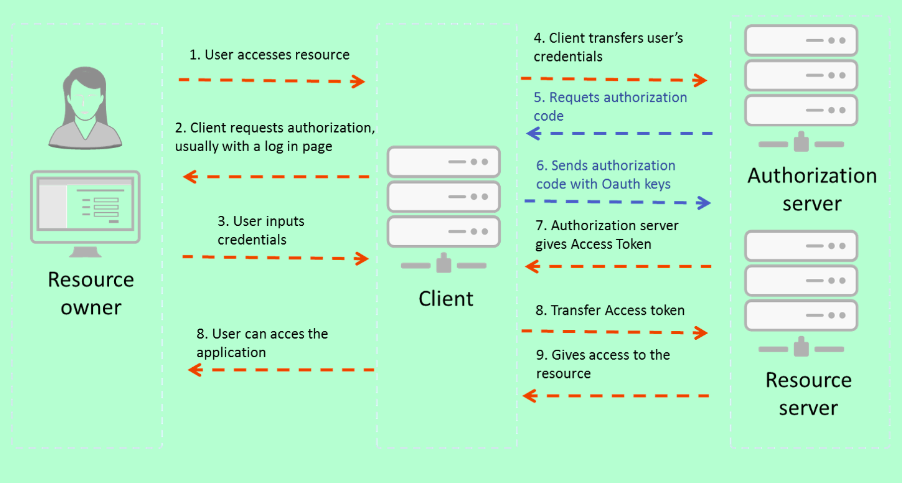
Complete OAuth 2.0 Flow: Step-by-Step
1. User Initiates Login (Frontend)
The user clicks "Sign in with Google" on your website/app.
Frontend generates a Google OAuth URL with parameters:
client_id(from your Google Cloud app)redirect_uri(where Google should send the user back)scope(what info you want, e.g., email, profile)response_type=code(because we want an authorization code)
Browser is redirected to Google's login page.
2. Google Authenticates User (Google Servers)
- If the user isn't logged in, Google prompts for credentials
- Google shows a consent screen listing the permissions your app requests
- User clicks "Allow"
- Google redirects the browser to your specified
redirect_uriwith a code parameter in the URL
3. Frontend Sends Code to Backend (Your Server)
The frontend does not directly use the code — it sends it to your backend (via HTTPS POST).
Why? Because you need your client_secret, which must be kept safe on the backend, to exchange the code.
4. Backend Exchanges Code for Tokens (Google Token Endpoint)
Your backend sends a secure server-to-server POST request to:
https://oauth2.googleapis.com/token
With parameters:
client_idclient_secretcode(from step 3)redirect_urigrant_type=authorization_code
Google responds with:
- Access Token – can call Google APIs on behalf of the user
- ID Token – a JWT signed by Google containing user identity info
- (optional) Refresh Token – to get new access tokens without re-login
5. Backend Gets User Profile (Google UserInfo API)
Using the access token, your backend calls:
https://www.googleapis.com/oauth2/v3/userinfo
Google returns the user's profile (name, email, picture, etc.).
6. Backend Creates/Finds User in DB
Your backend checks if the email exists in your database:
- If yes → log them in
- If no → create a new user record
7. Backend Issues Your JWT (for Your App)
Your backend now creates its own JWT containing claims:
sub: your internal user IDname,email, etc. (optional)iat(issued at),exp(expiry time)
Important: This JWT is signed with your app's secret key (not Google's).
This JWT is different from Google's ID token — it's for your API authorization.
8. JWT Sent to Frontend
You can send this token to the frontend in one of two ways:
Option 1: HTTP-only cookie (safer from XSS) Option 2: JSON response (frontend stores in memory or session storage — but be careful with XSS risks)
9. Frontend Uses JWT for API Requests
On every API call, the frontend sends:
Authorization: Bearer <your-JWT>
The backend verifies the JWT signature & expiry before allowing access.
10. Session Flow Summary
- Google handles authentication (proving identity)
- You handle authorization & session (via your JWT)
- Your backend does not have to call Google every time — it trusts the JWT it issued
Why This Flow is Secure
1. Client Secret Protection
- Never exposed to frontend/browser
- Only server-to-server communication uses it
2. Short-lived Tokens
- Authorization codes expire quickly (usually 10 minutes)
- Access tokens have limited lifetime
3. HTTPS Only
- All sensitive data transmitted over secure connections
- Prevents man-in-the-middle attacks
4. JWT Verification
- Your backend signs JWTs with its own secret
- Can verify authenticity without external calls
Security Best Practices
✅ Do This
- Use HTTPS everywhere
- Store client secrets securely on backend only
- Implement JWT expiration (15 minutes to 1 hour)
- Use HTTP-only cookies for token storage when possible
- Validate redirect URIs strictly
❌ Avoid This
- Never store client secrets in frontend code
- Don't use JWT for sensitive data beyond user identification
- Avoid long-lived tokens without refresh mechanism
- Don't skip token signature verification
OAuth 2.0 vs Other Authentication Methods
| Method | Pros | Cons | Best For |
|---|---|---|---|
| OAuth 2.0 | Secure, scalable, user-friendly | Complex implementation | Modern web/mobile apps |
| Session Cookies | Simple, server-controlled | Not suitable for APIs | Traditional web apps |
| Basic Auth | Very simple | Credentials in every request | Internal APIs only |
| API Keys | Simple for APIs | No user context | Service-to-service |
Troubleshooting Common Issues
Invalid Redirect URI
- Cause: Mismatch between configured and requested redirect URI
- Solution: Ensure exact match in Google Cloud Console and your code
Invalid Client
- Cause: Wrong client ID or client secret
- Solution: Double-check Google Cloud Console credentials
Token Expired
- Cause: JWT or access token expired
- Solution: Implement refresh token flow or re-authenticate
CORS Issues
- Cause: Cross-origin requests blocked
- Solution: Configure proper CORS headers on backend
Final Takeaway
OAuth 2.0 transforms authentication from a security headache into a streamlined, secure process. By letting trusted providers like Google handle identity verification, you can focus on building your application's core features while maintaining enterprise-level security.
Key Benefits:
- User Experience: No password fatigue for users
- Security: Leverage Google's world-class security infrastructure
- Scalability: Handle millions of users without authentication complexity
- Development Speed: Focus on features, not auth infrastructure
Remember: Google proves who they are, you decide what they can do. This separation of concerns is what makes OAuth 2.0 so powerful and widely adopted.
Tags
OAuth 2.0 Authentication Authorization JWT Google Login API Security Web Development Session Management Access Tokens Backend Security